Leaking water gasket & top end rebuild how to
Moderators: User administrators, Moderators
Re: Leaking water gasket & top end rebuild how to
Very interesting i have a diesel but nice to see what the petrol looks like! 
1984 T25 1.9D 1Y
-
mm289
- Registered user
- Posts: 314
- Joined: 31 Dec 2010, 22:00
- 80-90 Mem No: 9111
- Location: Dover, Kent
Re: Leaking water gasket & top end rebuild how to
OK, starting to put it all together now 
Have I said before about cleaning everything really well before you re-assemble I also clean the stud and head caps threads with a tap/die before re-assembly to make it easier for the next poor soul who has to remove the head (in this case me!). Whilst your prepping, if you are re-using your original push rod tubes you need to gently expand the compression rings till the distance from one end of the rings to the other is > 194mm and fit new push rod tube seals. (Some builders will fit 2 piece expanding tubes at this stage to make removal/refitting possible without taking the heads off)
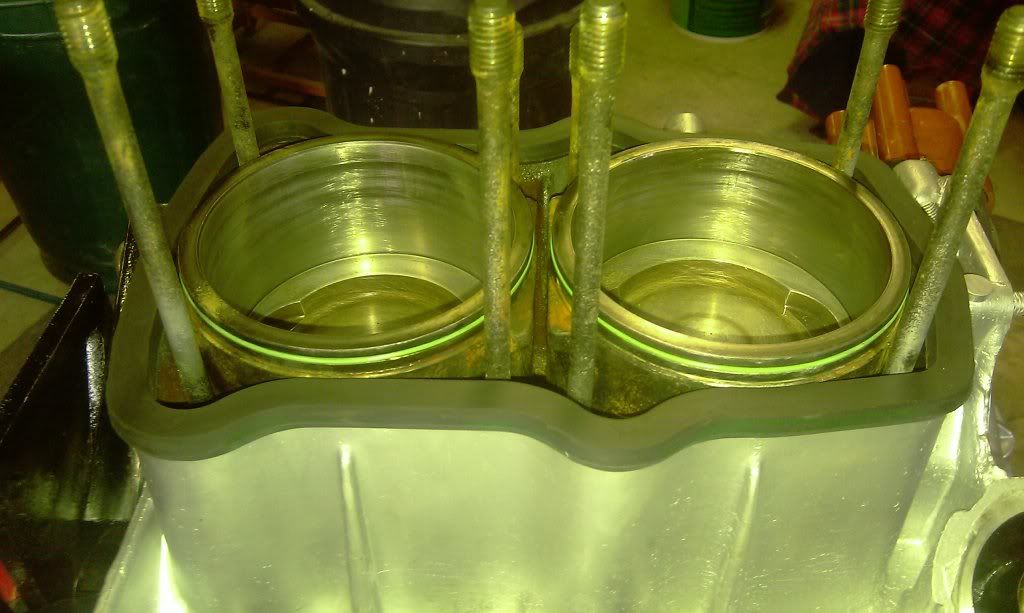
So, starting with the liner nearest the flywheel pop on the black (bottom) and green (top) o-rings. I just use a bit of light oil as lubrication and no sealant on either o-ring (some use sealant on the top (green) ring apparantly), Also clean the area where the liner will seat in the case being careful not to drop any rubbish into the sump! Then raise the rod and drop the combined liner/piston into the case having already fitted the circlip nearest the flywheel (when fitting circlips use a this screwdriver or small allen key in the eye of the circlip and rotate it both ways to make sure it is seated properly.
You should then be able to line up the rod/piston and slide the wrist/gudgeon pin in. It is quite fiddly but persevere and you will win - and this is where having cleaned up the wrist pin earlier will pay HUGE dividends. Once the pin is fully in fit the second circlip, being real careful not to drop it! You should then look something like this:

Then follow the same process for the second liner/piston on the same side, bit less room to work in but it's not too bad.
We can then fit the water jacket seal. In your gasket set you will probably have 2 tubes of sealant. The larger tube (black) is for the water jacket and will work on most other sealing surfaces on the engine. In a Victor reinz kit this is "Reinzosil" and can be bought seperately (other builders also use Elring sealants in the Curil and Dirko range). The little tube of yellow sealant is for putting under the head bolt caps and sealing to the head to stop water escaping up through the bolt holes.
I place a 2mm bead of sealant in the channel of the water jacket and then fit this to the case:
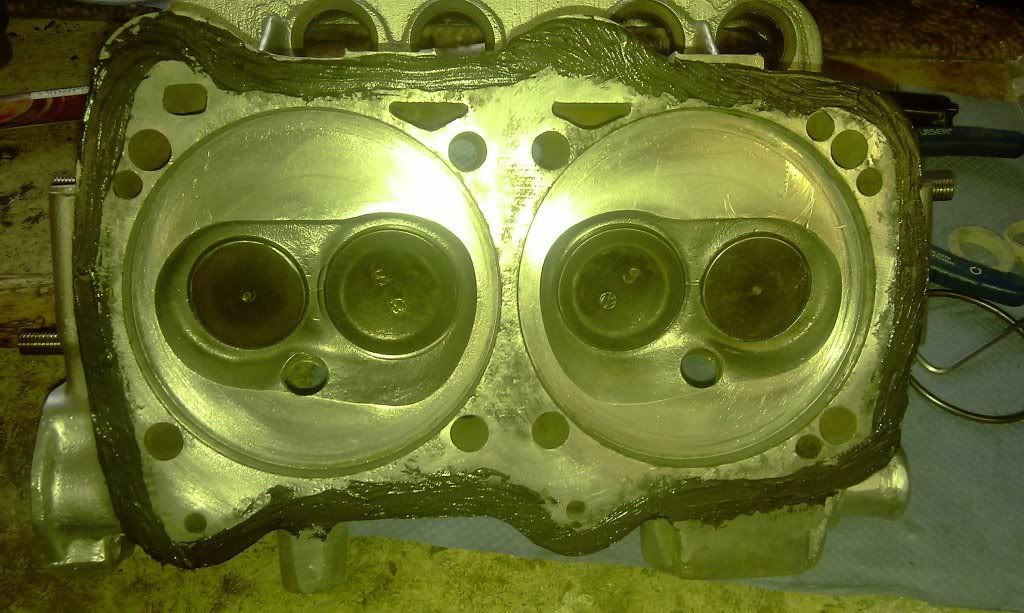
I then put a 2mm bead on the sealing surface of the head and smooth it out slightly, this helps to fill the slight pitting in the head and is better than relying just on the compression of the seal to do this in my view. The head then looks like this:
Once this is done you can put the pushrod tubes roughly in place (this is where an engine stand helps as you can position the engine "vertically" so stuff doesn't keep falling out) then lower the head carefully over the studs. The head won't seat fully as the expanded pushrod tubes will hold it up.
Check the tubes are properly seated (Bentley also says thaht the seam on the tube should be facing up - not sure why) and then sloooowly torque down the head following the sequence in the manual. I start of with an inital torque off 10 lb ft and gradually increase until I hit the recommended 37 lb ft.
You can then drop the push rods back in their right tubes (hopefully we remembered to number them at the beginning) and bolt on the rocker shaft (18 lb ft). It is really easy to get a pushrod that doesn't drop into the seat of the hydraulic tappet/follower so be careful how you put them in. As a check turn the crank until all valves would be in their "closed" position and the pushrods should all be at the same height. If one is higher than the others then odds on it hasn't seated properly.
It is a good idea to check the rocker/valve adjustment at this stage - won't cover it here but it is in the wiki here http://wiki.club8090.co.uk/index.php/Hy ... _explained
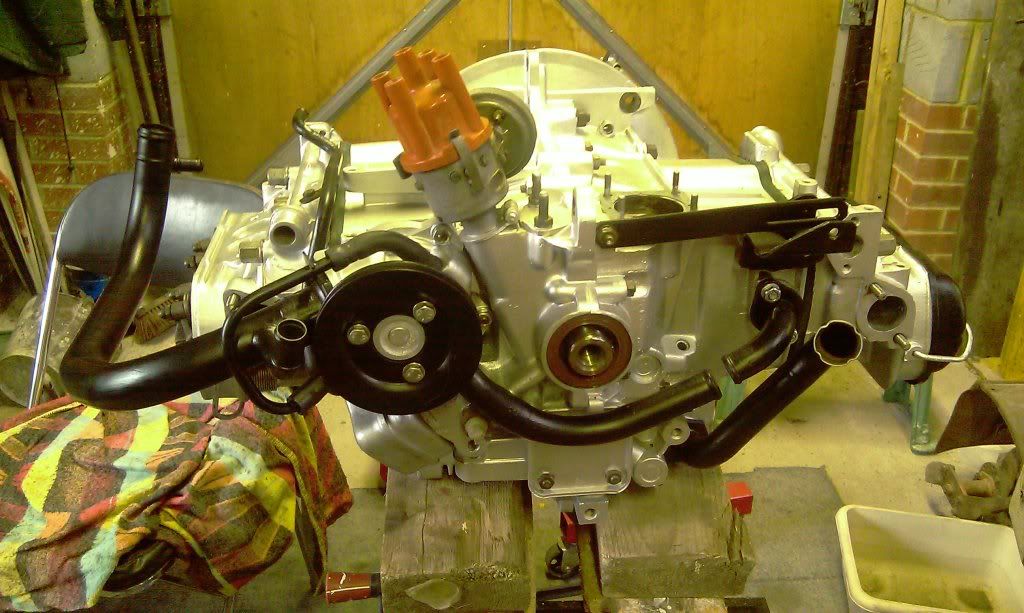
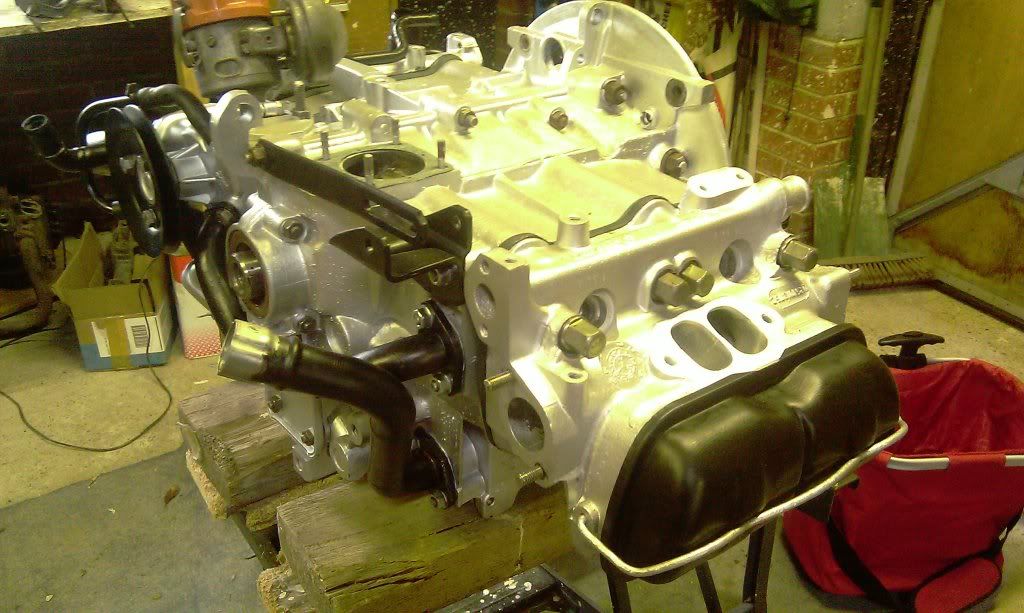
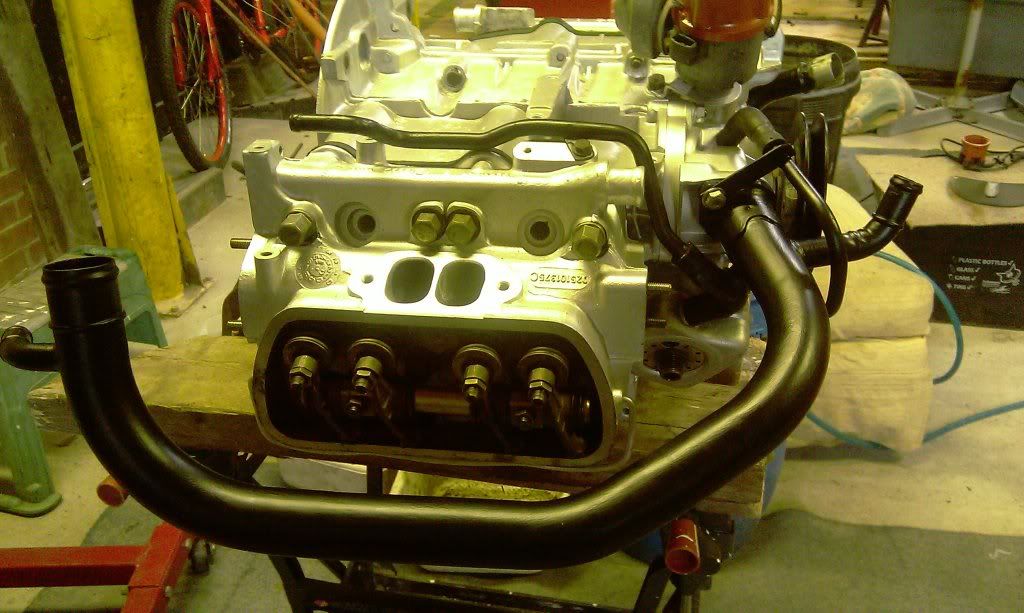
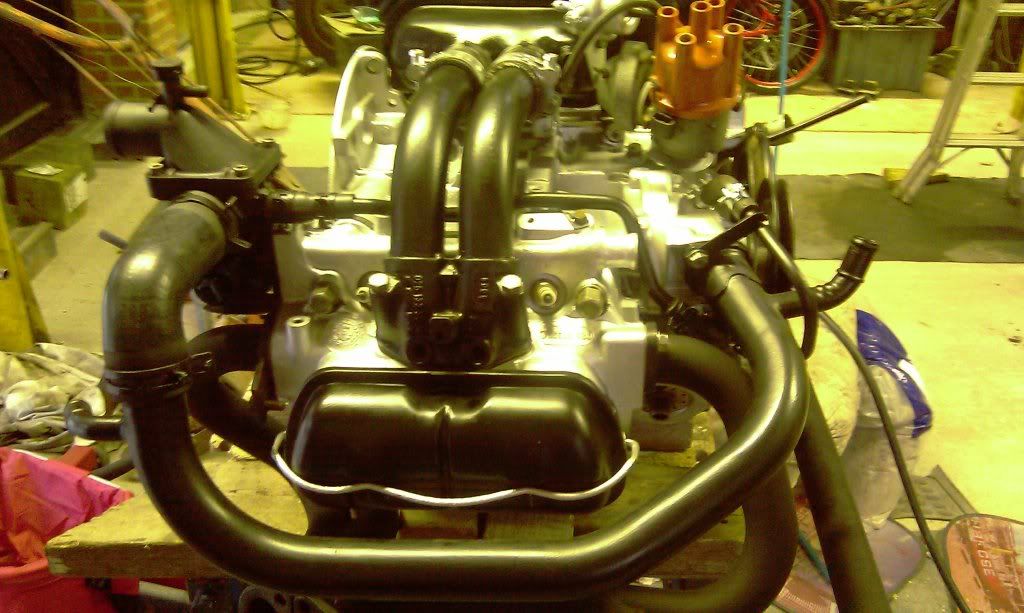
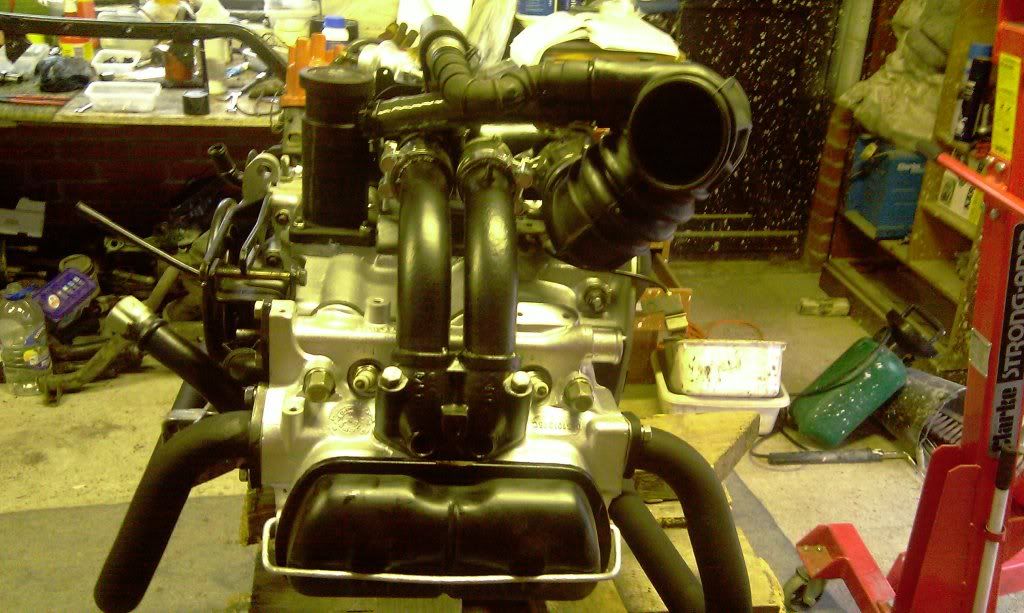
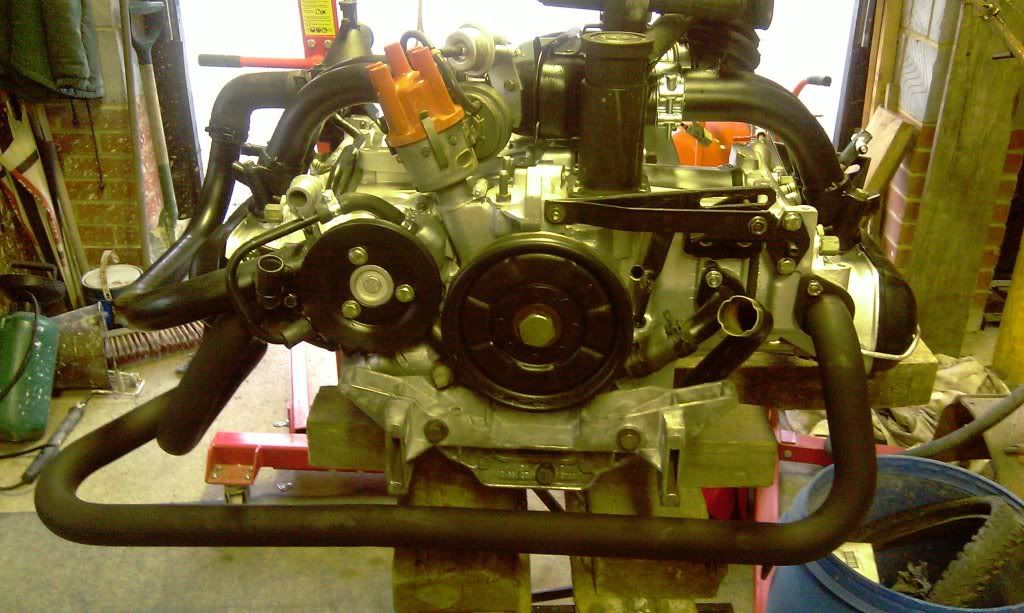
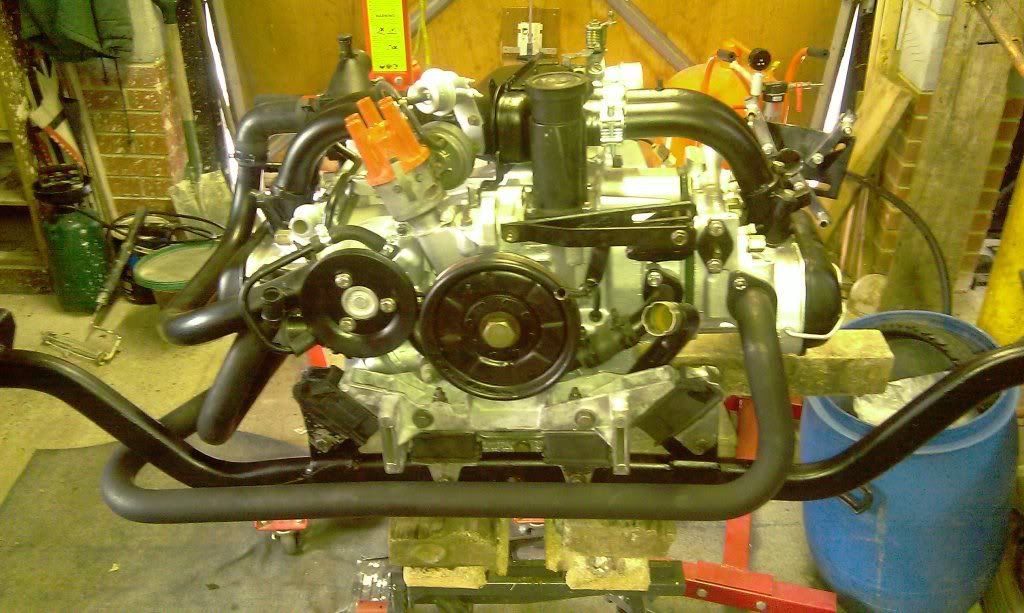
When all is bolted down,(and assuming you have taken the effort to clean and re-paint your engine ) you should end up with something that looks like this
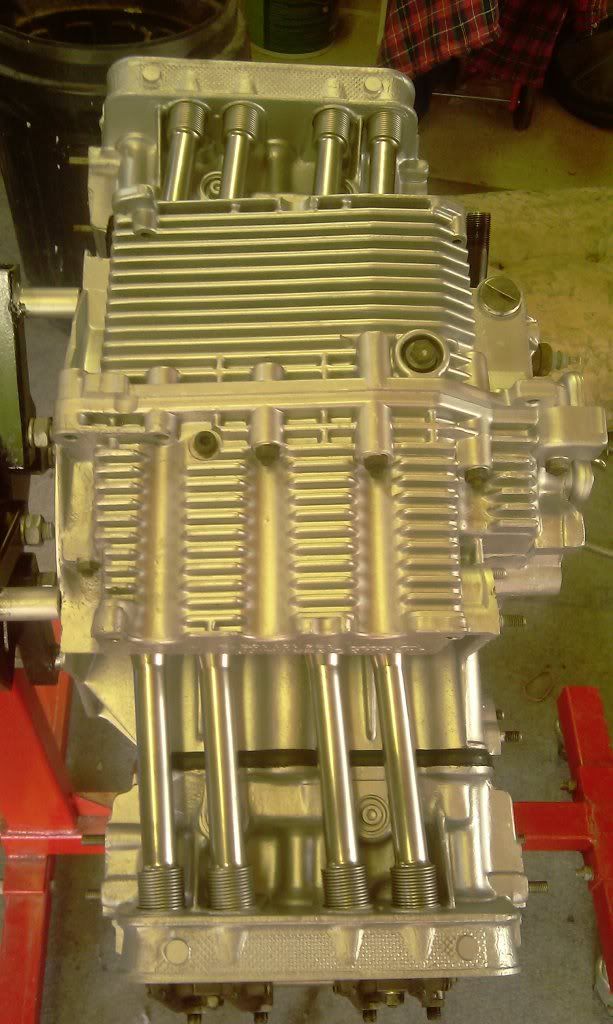
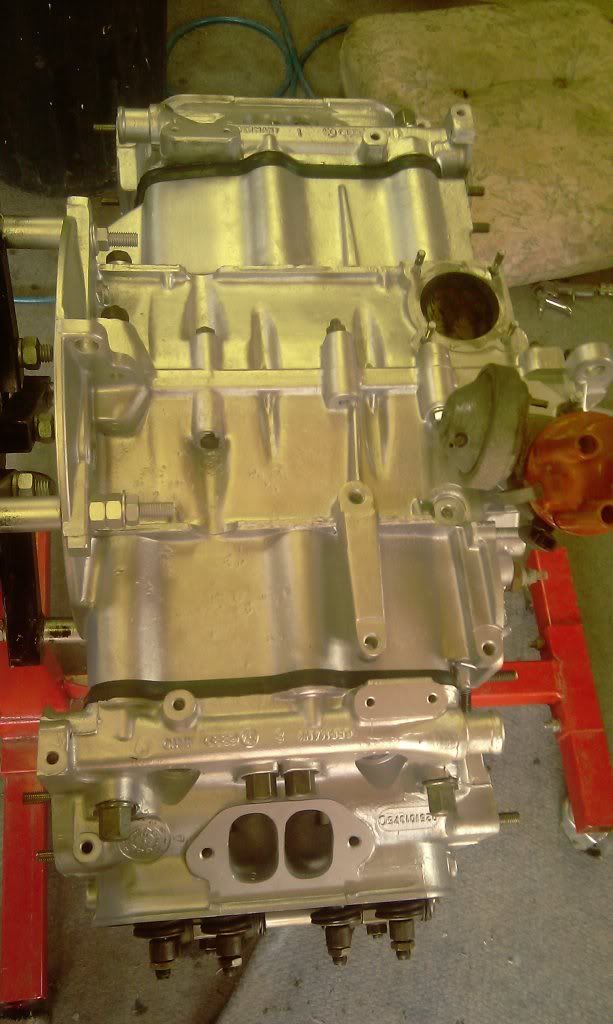
There you go, some more engine porn to keep ya going, hope it was worth the wait
Next up, more cleaning and painting then re-assembly
MM
Have I said before about cleaning everything really well before you re-assemble
So, starting with the liner nearest the flywheel pop on the black (bottom) and green (top) o-rings. I just use a bit of light oil as lubrication and no sealant on either o-ring (some use sealant on the top (green) ring apparantly), Also clean the area where the liner will seat in the case being careful not to drop any rubbish into the sump! Then raise the rod and drop the combined liner/piston into the case having already fitted the circlip nearest the flywheel (when fitting circlips use a this screwdriver or small allen key in the eye of the circlip and rotate it both ways to make sure it is seated properly.
You should then be able to line up the rod/piston and slide the wrist/gudgeon pin in. It is quite fiddly but persevere and you will win - and this is where having cleaned up the wrist pin earlier will pay HUGE dividends. Once the pin is fully in fit the second circlip, being real careful not to drop it! You should then look something like this:
Then follow the same process for the second liner/piston on the same side, bit less room to work in but it's not too bad.
We can then fit the water jacket seal. In your gasket set you will probably have 2 tubes of sealant. The larger tube (black) is for the water jacket and will work on most other sealing surfaces on the engine. In a Victor reinz kit this is "Reinzosil" and can be bought seperately (other builders also use Elring sealants in the Curil and Dirko range). The little tube of yellow sealant is for putting under the head bolt caps and sealing to the head to stop water escaping up through the bolt holes.
I place a 2mm bead of sealant in the channel of the water jacket and then fit this to the case:
I then put a 2mm bead on the sealing surface of the head and smooth it out slightly, this helps to fill the slight pitting in the head and is better than relying just on the compression of the seal to do this in my view. The head then looks like this:
Once this is done you can put the pushrod tubes roughly in place (this is where an engine stand helps as you can position the engine "vertically" so stuff doesn't keep falling out) then lower the head carefully over the studs. The head won't seat fully as the expanded pushrod tubes will hold it up.
Check the tubes are properly seated (Bentley also says thaht the seam on the tube should be facing up - not sure why) and then sloooowly torque down the head following the sequence in the manual. I start of with an inital torque off 10 lb ft and gradually increase until I hit the recommended 37 lb ft.
You can then drop the push rods back in their right tubes (hopefully we remembered to number them at the beginning) and bolt on the rocker shaft (18 lb ft). It is really easy to get a pushrod that doesn't drop into the seat of the hydraulic tappet/follower so be careful how you put them in. As a check turn the crank until all valves would be in their "closed" position and the pushrods should all be at the same height. If one is higher than the others then odds on it hasn't seated properly.
It is a good idea to check the rocker/valve adjustment at this stage - won't cover it here but it is in the wiki here http://wiki.club8090.co.uk/index.php/Hy ... _explained
When all is bolted down,(and assuming you have taken the effort to clean and re-paint your engine
There you go, some more engine porn to keep ya going, hope it was worth the wait
Next up, more cleaning and painting
MM
-
kevtherev

- Registered user
- Posts: 18830
- Joined: 23 Oct 2005, 20:13
- 80-90 Mem No: 2264
- Location: Country estate Wolverhampton Actually
Re: Leaking water gasket & top end rebuild how to
A thing of beauty
pass me a tissue
pass me a tissue
AGG 2.0L 8V. (Golf GTi MkIII)
-
mm289
- Registered user
- Posts: 314
- Joined: 31 Dec 2010, 22:00
- 80-90 Mem No: 9111
- Location: Dover, Kent
Re: Leaking water gasket & top end rebuild how to
will do, do you mind a used one as I am crying with laughter from your oil change thread 
- I presume/hope it wasn't your own experience you were reciting?
MM
- I presume/hope it wasn't your own experience you were reciting?
MM
'89 Autosleeper Trident
2.1 DJ
Member 9111
2.1 DJ
Member 9111
-
kevtherev
- Registered user
- Posts: 18830
- Joined: 23 Oct 2005, 20:13
- 80-90 Mem No: 2264
- Location: Country estate Wolverhampton Actually
Re: Leaking water gasket & top end rebuild how to
No,MM it was adapted from a post on thesamba... You see...even Americans can have a sense of humour
AGG 2.0L 8V. (Golf GTi MkIII)
-
silverbullet
- Trader
- Posts: 16346
- Joined: 08 Jun 2009, 09:51
- 80-90 Mem No: 6908
- Location: Surrey Syncronaut #156
- Contact:
Re: Leaking water gasket & top end rebuild thread
Just a little addition - make sure you disturb the drain screw in each head and grease the threads. I made a point of doing it on my current rebuild and they were very tight.mm289 wrote:.

Would definitely have struggled to crack them undone when under the van...
-
mm289
- Registered user
- Posts: 314
- Joined: 31 Dec 2010, 22:00
- 80-90 Mem No: 9111
- Location: Dover, Kent
Re: Leaking water gasket & top end rebuild how to
yep, done. threads cleaned, copperslipped and new copper washer fitted. Might even be able to use them now 
MM
MM
'89 Autosleeper Trident
2.1 DJ
Member 9111
2.1 DJ
Member 9111
-
mm289
- Registered user
- Posts: 314
- Joined: 31 Dec 2010, 22:00
- 80-90 Mem No: 9111
- Location: Dover, Kent
Re: Leaking water gasket & top end rebuild how to
Now the main engine is built my attention has swapped to all the ancilliaries, pipes, injectors etc.
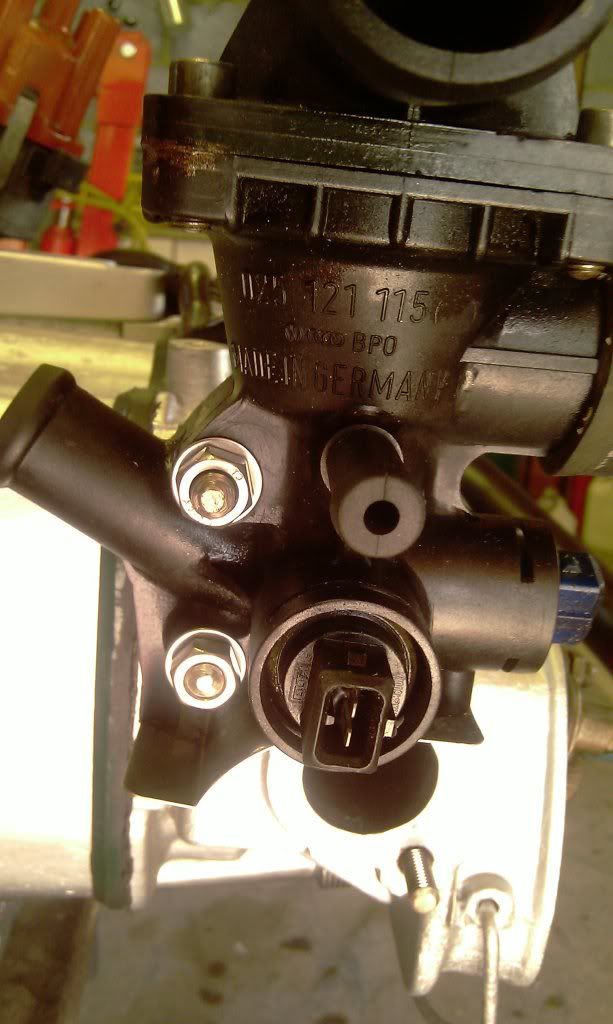
Any metal work has been stripped, cleaned and painted to try and preserve its life span. The water pipes on these are really susceptible to leaks especially if the wrong/no antifreeze has been used so make sure you check and clean everything thoroughly even if you aren't repainting like I am.
To give you a few before and afters these show the effects of a good clean (without painting)

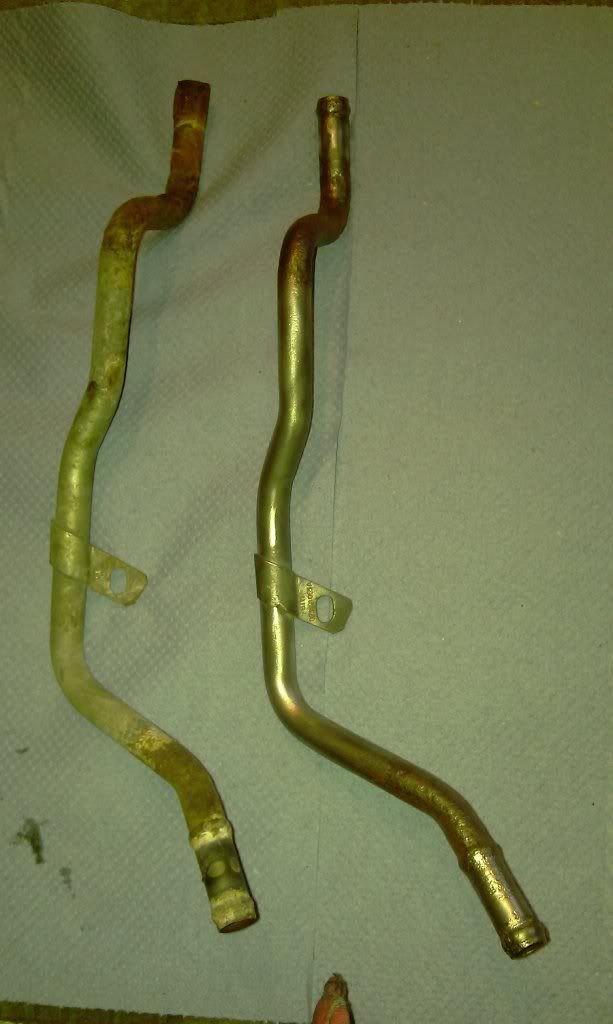
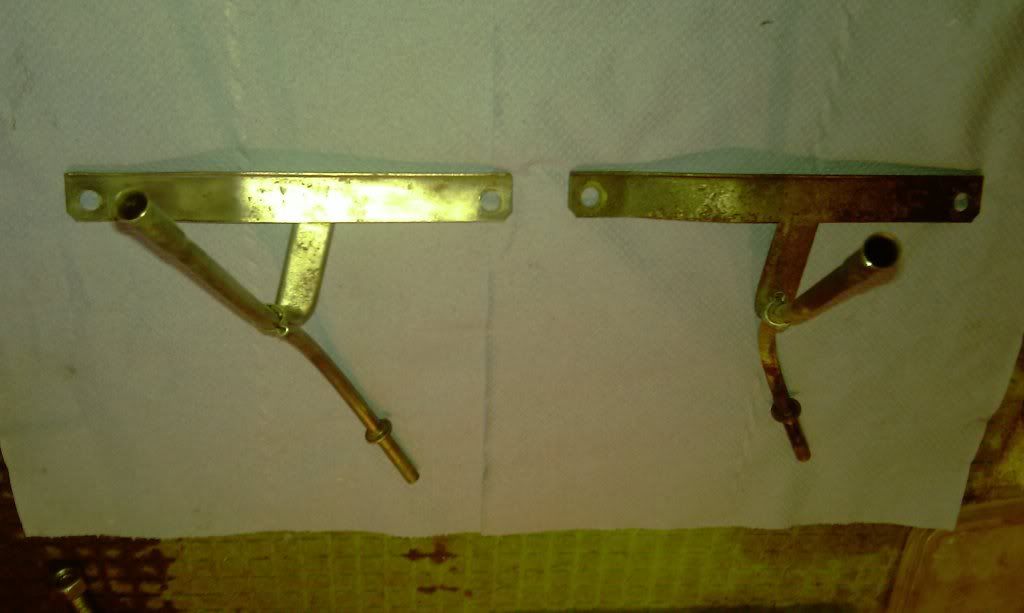
At the same time as cleaning all these up I have also replaced the small 90 degree and straight reducer hoses around the water pump and oil cooler as well.
The throttle body, intake pipes and injectors looked something like this:
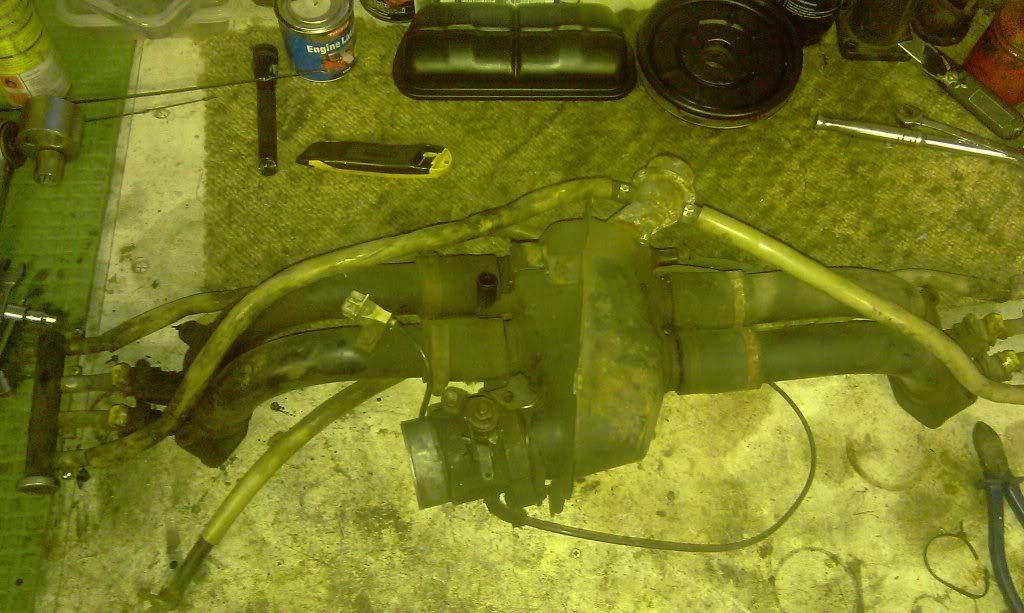
The injectors are in a right state, i will put them into an injector cleaning place locally but they may well be beyond salvaging!

And this is why cleaning and inspecting is so important. Once I had got the intake pipes stripped they looked in pretty good nick with just a few scabby bits here and there. I wire brushed them anyway and found this
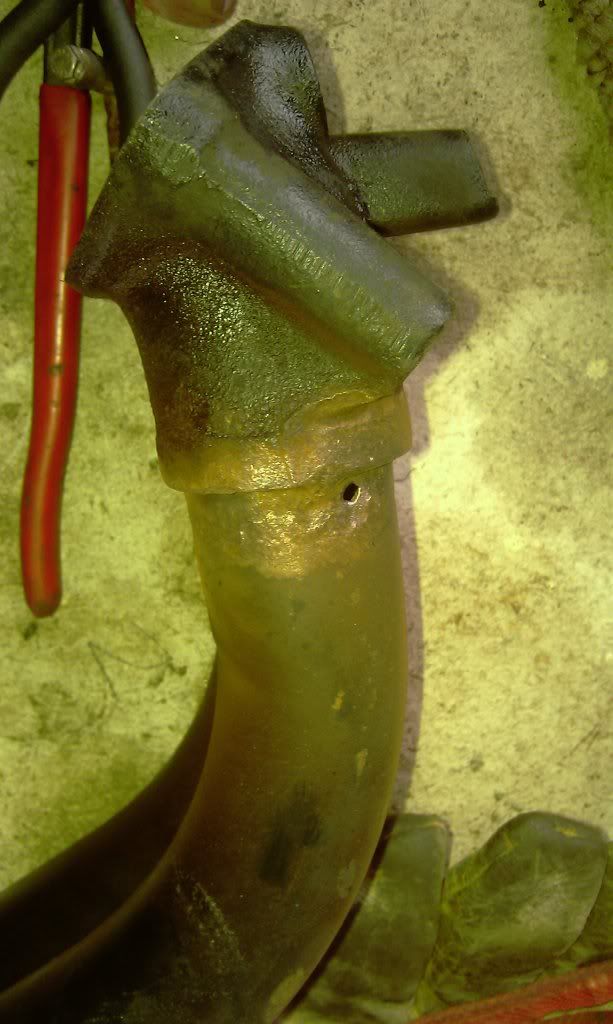
If I hadn't seen this, I would have been searching for ever for a rough running/misfire symptom as this would cause an inlet side air leak - and probably would never have found it!!
Fortunately I have a spare so both are now being treated with anti rust prior to painting. I am also experimenting with a rust removal product by Bilt Hamber called deox-C. Its an organic compound for removing rust and leaving clean metal which can then be painted, will post some pics later, but am using it to clean up all the spring clips so I can keep the original look without loads of jubilee clamps everywhere
More cleaning and painting to do but we are getting there....
MM
Any metal work has been stripped, cleaned and painted to try and preserve its life span. The water pipes on these are really susceptible to leaks especially if the wrong/no antifreeze has been used so make sure you check and clean everything thoroughly even if you aren't repainting like I am.
To give you a few before and afters these show the effects of a good clean (without painting)
At the same time as cleaning all these up I have also replaced the small 90 degree and straight reducer hoses around the water pump and oil cooler as well.
The throttle body, intake pipes and injectors looked something like this:
The injectors are in a right state, i will put them into an injector cleaning place locally but they may well be beyond salvaging!
And this is why cleaning and inspecting is so important. Once I had got the intake pipes stripped they looked in pretty good nick with just a few scabby bits here and there. I wire brushed them anyway and found this
If I hadn't seen this, I would have been searching for ever for a rough running/misfire symptom as this would cause an inlet side air leak - and probably would never have found it!!
Fortunately I have a spare so both are now being treated with anti rust prior to painting. I am also experimenting with a rust removal product by Bilt Hamber called deox-C. Its an organic compound for removing rust and leaving clean metal which can then be painted, will post some pics later, but am using it to clean up all the spring clips so I can keep the original look without loads of jubilee clamps everywhere
More cleaning and painting to do but we are getting there....
MM
'89 Autosleeper Trident
2.1 DJ
Member 9111
2.1 DJ
Member 9111

-
silverbullet
- Trader
- Posts: 16346
- Joined: 08 Jun 2009, 09:51
- 80-90 Mem No: 6908
- Location: Surrey Syncronaut #156
- Contact:
Re: Leaking water gasket & top end rebuild how to
That is one shiney wbx Are you sure this isn't the samba 
PS how to remove the crank sensor? Not needed in my case, but it's jiggered so I may as well take out what's left and plug the hole...
PS how to remove the crank sensor? Not needed in my case, but it's jiggered so I may as well take out what's left and plug the hole...
-
mm289
- Registered user
- Posts: 314
- Joined: 31 Dec 2010, 22:00
- 80-90 Mem No: 9111
- Location: Dover, Kent
Re: Leaking water gasket & top end rebuild how to
I saw 10c had posted today so you never knowsilverbullet wrote:That is one shiney wbx
PS how to remove the crank sensor? Not needed in my case, but it's jiggered so I may as well take out what's left and plug the hole...
The crank sensor is just a push fit, if you have the engine out you can just use a similar sized punch and push out from the gearbox side. If engine is in situ I would probs leave it and just seal off the wire
MM
'89 Autosleeper Trident
2.1 DJ
Member 9111
2.1 DJ
Member 9111

Re: Leaking water gasket & top end rebuild how to
Just pulled one of mine out for a top end rebuild, so reading your great thread as a bit of revision.
Is there any value other than cosmetic to painting the heads and case?
What grit wet and dry for sealing faces? I have everything up to 2000 knocking about.
I read a Laurie Petit post a few days back that mentioned lapping the barrels to the head, I haven't done any lapping before and wonder what kind of pressure to apply, I assume fine grinding paste is that right?
thanks
skell
2.1 DJ 'velle
AAZ 'velle
-
mm289
- Registered user
- Posts: 314
- Joined: 31 Dec 2010, 22:00
- 80-90 Mem No: 9111
- Location: Dover, Kent
Re: Leaking water gasket & top end rebuild how to
The painting is kinda cosmetic, although properly cleaning components is a great discipline when doing a rebuild. As mentioned above I wouldn't have found the hole in the intake tube if I hadn't been rigorous in cleaning. ultimately the alloy case will corrode if left uncared for but it takes a long time
I have heard of people lapping in the liners to the head and Laurie talks about this in his write up in Volksworld (he uses course paste). I assume he did this before fitting the metal compression ring as a way of cleaning up the mating surfaces on the barrel and the head, 'cause on rebuild you will put a new metal compression ring in between these two components so they will not mate face to face.
I used a reasonably course grit, 600 IIRC but lubricated with paraffin, but just lightly rubbing.
HTH, and I must get on and post the last pics
MM
'89 Autosleeper Trident
2.1 DJ
Member 9111
2.1 DJ
Member 9111
-
mm289
- Registered user
- Posts: 314
- Joined: 31 Dec 2010, 22:00
- 80-90 Mem No: 9111
- Location: Dover, Kent
Re: Leaking water gasket & top end rebuild how to
As this is meant to be a top end rebuild thread I will make this my last post, although I will drop in occasionally with updates on how the engine is going
So, started re-fitting all the ancillaries after stripping, cleaning and re-painting them all. Have used silicone to replace rubber pipes for the intake plenum chamber to intake tubes and the crank vent to intake plenum chamber. Also have either refurbished the original spring clamps or fitted new clamps as an alternative to jubilee clips as these give a better seal on areas with high temperature variations.
It’s not shown in these pics but I have also replaced all the rubber fuel lines with new stainless steel braided hi-pressure lines. Good precaution on an old engine and looks way better than having all those faded plastic sleeves everywhere!
The bolts that hold the thermostat/coolant distribution block to the head seem very prone to rusting, especially the one nearest the exhaust header. They either seize into the housing wrecking it or snap on removal, so I have replaced these with stainless steel studs/nuts. You could just use stainless M8 bolts but I had the studding already so this was an easy option for me.
Have now fitted all the exhaust headers and cleaned up engine mounts as well. Check the mount rubber, if it has come detached or is overly loose then replace.
Other things to note:
- Don’t forget to fit a new o-ring to the dipstick tube and make sure it seats properly
- The alternator brackets seem to be prone to failure – I haven’t had one go but check out the area and if yours goes look on the samba or benplace for fix’s
- The oil breather tower has a rubber o-ring seal that needs replacing, do not rely just on the paper gasket that comes in the kit.
- If any of your vacuum lines look iffy, replace with new ones. A leak on the intake side is a pig to find and will cause poor idling/running.
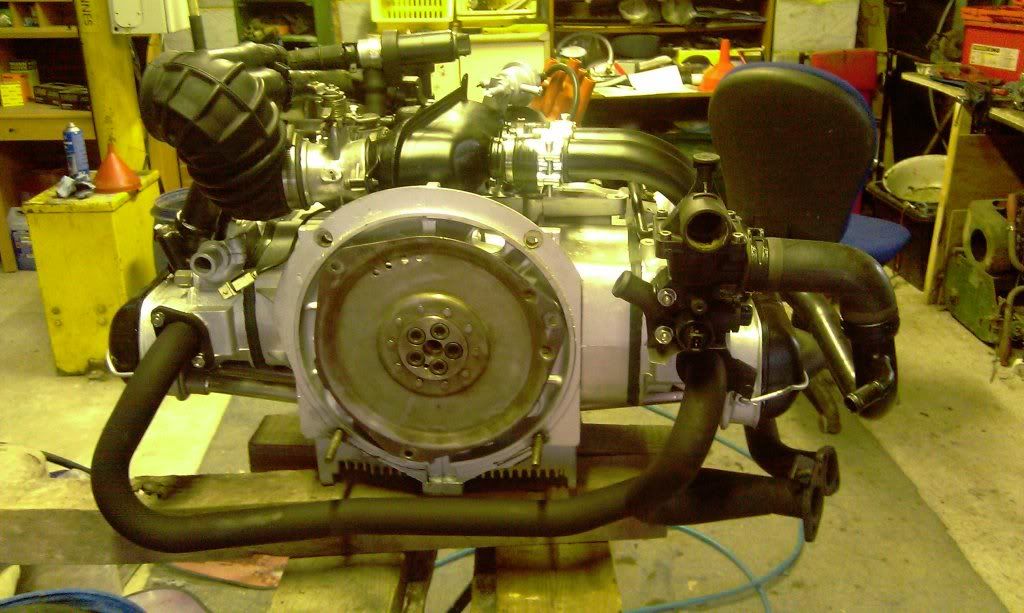
And now the engine is pretty much ready to go back in.
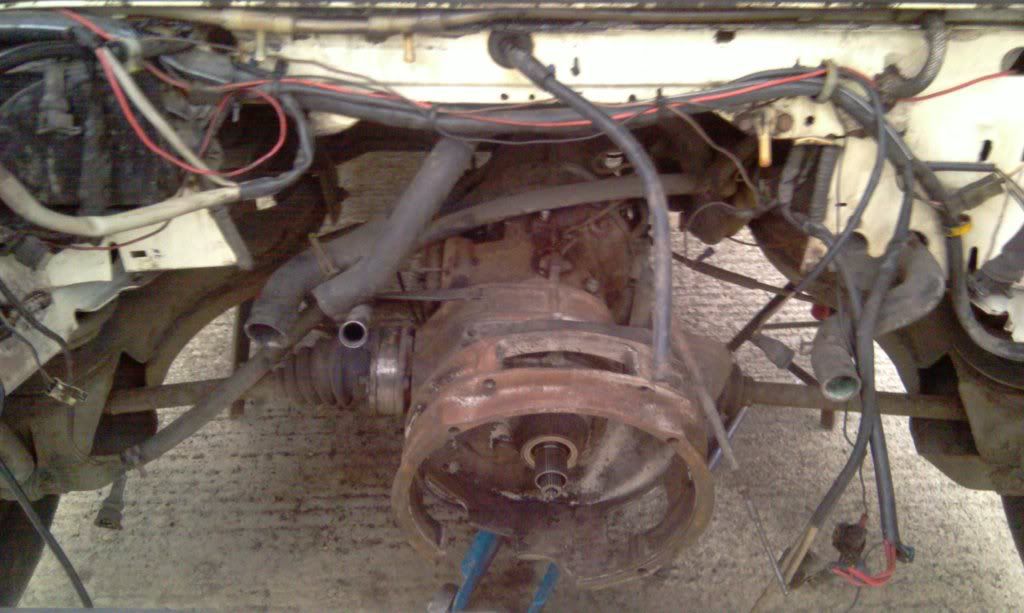
Had a quick go at cleaning the engine bay and diff/tranny whilst the engine was out. Will drop the box out and clean properly when I do the bodywork/respray but at least it has got 22 years of crud off it!!
Hope this thread has been useful for you, doing a top end rebuild doesn’t have to be a disaster or an engine “write off” – recon’s can be had for as little as £1000 but I would rather know what I had under me than trust someone else’s work unless I really know what they have done.
Parts for this rebuild were probs less than £200, (gasket ~£70, rings ~£80, plus hoses, consumables etc). On top of that I have spent A LOT OF HOURS, but most of that is cause I chose to clean, inspect and paint everything.
If you think it is worthy of a wiki entry ping the mods and if requested I am happy to help migrate it across.
Enjoy your engine building.
MM (Paul)
So, started re-fitting all the ancillaries after stripping, cleaning and re-painting them all. Have used silicone to replace rubber pipes for the intake plenum chamber to intake tubes and the crank vent to intake plenum chamber. Also have either refurbished the original spring clamps or fitted new clamps as an alternative to jubilee clips as these give a better seal on areas with high temperature variations.
It’s not shown in these pics but I have also replaced all the rubber fuel lines with new stainless steel braided hi-pressure lines. Good precaution on an old engine and looks way better than having all those faded plastic sleeves everywhere!
The bolts that hold the thermostat/coolant distribution block to the head seem very prone to rusting, especially the one nearest the exhaust header. They either seize into the housing wrecking it or snap on removal, so I have replaced these with stainless steel studs/nuts. You could just use stainless M8 bolts but I had the studding already so this was an easy option for me.
Have now fitted all the exhaust headers and cleaned up engine mounts as well. Check the mount rubber, if it has come detached or is overly loose then replace.
Other things to note:
- Don’t forget to fit a new o-ring to the dipstick tube and make sure it seats properly
- The alternator brackets seem to be prone to failure – I haven’t had one go but check out the area and if yours goes look on the samba or benplace for fix’s
- The oil breather tower has a rubber o-ring seal that needs replacing, do not rely just on the paper gasket that comes in the kit.
- If any of your vacuum lines look iffy, replace with new ones. A leak on the intake side is a pig to find and will cause poor idling/running.
And now the engine is pretty much ready to go back in.
Had a quick go at cleaning the engine bay and diff/tranny whilst the engine was out. Will drop the box out and clean properly when I do the bodywork/respray but at least it has got 22 years of crud off it!!
Hope this thread has been useful for you, doing a top end rebuild doesn’t have to be a disaster or an engine “write off” – recon’s can be had for as little as £1000 but I would rather know what I had under me than trust someone else’s work unless I really know what they have done.
Parts for this rebuild were probs less than £200, (gasket ~£70, rings ~£80, plus hoses, consumables etc). On top of that I have spent A LOT OF HOURS,
If you think it is worthy of a wiki entry ping the mods and if requested I am happy to help migrate it across.
Enjoy your engine building.
MM (Paul)
'89 Autosleeper Trident
2.1 DJ
Member 9111
2.1 DJ
Member 9111
-
marcus_asparagus

- Registered user
- Posts: 59
- Joined: 28 Feb 2007, 17:49
- 80-90 Mem No: 2884
- Location: Carmarthen, West Wales
Re: Leaking water gasket & top end rebuild how to
Now that Sir is engine porn!
Super write up, I'm almost looking forward to mine......?!
Thanks very muchly.
( Agree, get it in the Wiki.)
Mark.
Super write up, I'm almost looking forward to mine......?!
Thanks very muchly.
( Agree, get it in the Wiki.)
Mark.
If passing pop in kettle always on!
Member No.2884
1.9DG Kamper fitted with Dellorto 40's!
Wife's T5 174 axe Caravelle.
Member No.2884
1.9DG Kamper fitted with Dellorto 40's!
Wife's T5 174 axe Caravelle.