Page 1 of 2
Ci Autohome New Roof!
Posted: 09 May 2017, 22:10
by TheDocmeister
Well, some repair work or a new roof has been looming for a while - so inspired by the good weather over the last few days I decided to bite the bullet...
So, two 2400 x 1200 sheets of 25mm rigid foam board faced in glassfibre tissue and a sheet of 12mm exterior ply cut into 100mm wide strips. I had to cut down the boards down to get them to fit into the van to get them home. This wasn't really a problem since the widest board I could find was 1200mm and the roof needs to be 1400mm wide - so there would have to be a join somewhere anyway...

Pound shop sanding blocks, Lidl 'two for £3' breadknife and an old small sharp bladed knife for more intricate cutting!

I found a whole community of 'foamy' mini campers online and their favoured joining method seemed to be Gorilla Glue. I've never used this stuff before, but it seems to turn into some sort of sticky expanding foam when it comes into contact with water. My first attempt was the join down the middle of the roof. This seems to have joined OK, but the glue certainly expands as it cures. It may have been an idea to use tape along the length of the join to keep things a bit smoother, but the excess trimmed off OK. The entire roof will be encased in GRP/ epoxy so I'm not too concerned about the finish at this stage.
I've now got the side panels cut to shape too and have left the roof with the ply stuck down along the outside edges and across the roof at the skylight hole. I've had to come in to work this evening, so will get a picture of this framing in the morning - hopefully all bonded together nicely!
Re: Ci Autohome New Roof!
Posted: 10 May 2017, 20:58
by colinthefox
Interested to see progress on this one.......................
Re: Ci Autohome New Roof!
Posted: 11 May 2017, 10:15
by TheDocmeister
Well, turns out my day off had already been planned for me yesterday so not as much progress as I'd have liked...


The wooden framing stuck down well with the Gorilla Glue. I think the best method here is to go for no more than a smear of the glue across the whole of one face of the surfaces to join and then give the other side a reasonable wetting - I've been using a dish washing sponge. There's definitely a lot of potential expansion in the joins - the glue turns into a substance much like the aerosol expanding foam you buy in cans. The even distribution of glue is essential and I weighed down the wood with bricks to (successfully) avert the foaming glue pushing the joins apart. This is the first lot of framing having been left overnight to dry.

First off today then I added an extra strengthening rib between the skylight hole and the rear of the roof and then finished framing right around the skylight hole. Leaving that to dry, I went to pick up 12m of chopped strand mat and 3m of woven material to add a bit of strength to the GRP build. Along with 10L of resin, sufficient hardener, a couple of rollers, a metal roller to expel trapped air, a couple of stippling brushes and a couple of mixing buckets this came to pennies over £90. I still have to go back for brush/spray-able gel coat to finish off and possibly some more resin depending on how thick I decide to go with the lay-up.
Since we're on costs, the foam boards (2400x1200) were £51 the pair and I just grabbed a sheet of B&Q's finest 2440x1220 exterior ply at £25 too - firstly so I could get them to cut it up for me to give a quick and easy start and also because I can't fit an 8x4 board in the back of my camper! So, about £175 so far including tools.
That's against the £500 that seemed to be the going rate for a new 'cheaper' bare manufactured GRP shell. My biggest issue with that was that those I found advertised were in the South West of England and I'm just outside Glasgow - so there was either an 800mile round trip or £200+ courier fees to add to that price.
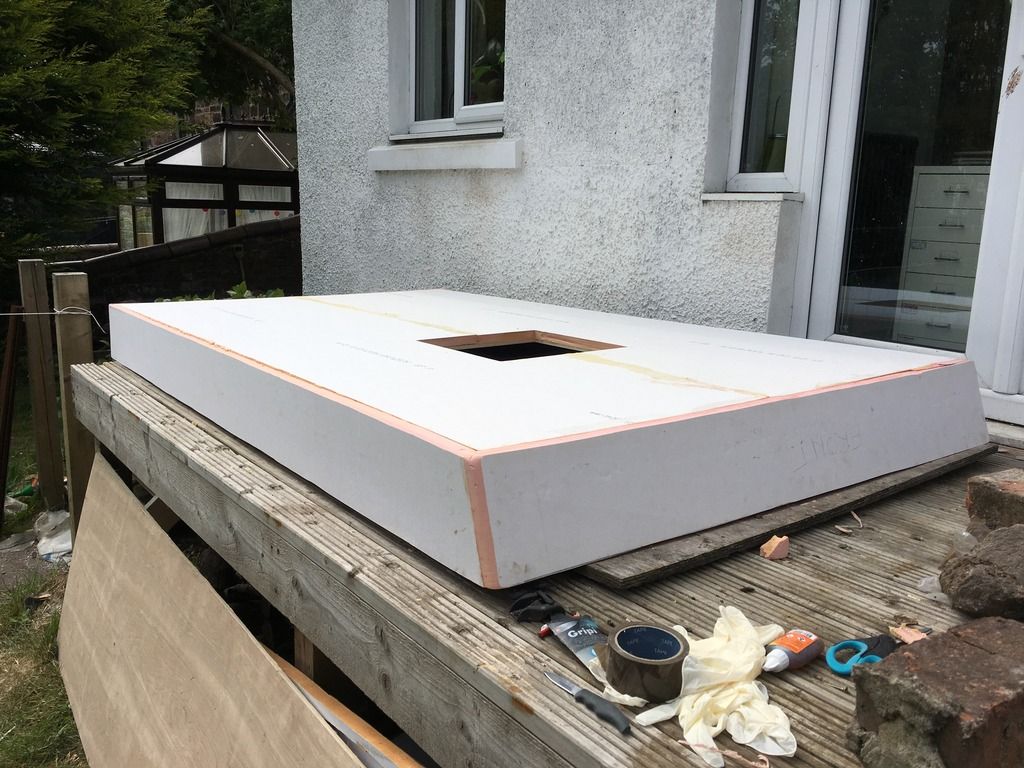
Anyway, I got on with more roof building once I'd got home from my shopping trip and got the sides and front panel attached before I had to call it a day...

I also trimmed back the skylight hole to match its frame and did a wee bit of shaping at the front. The metal brackets were really just to hold the panels in place whilst the glue set - the screws don't do well in the foam.
As you can see, I've sloped the front of the roof slightly and will be rounding all the corners. Should look better, but will also make it easier to wrap the fibreglass mat around smooth edges rather than sharp corners.
I'm in at work this morning, but hoping for some skiving this afternoon to get home and crack on a bit more before the weather breaks!
Re: Ci Autohome New Roof!
Posted: 11 May 2017, 20:46
by colinthefox
Good work! I had a rotten Autohomes roof, and ended up redesigning and rebuilding something slimmer, as shown in the signature photo.
You will need a slight bow upwards in the roof to shed rain. Otherwise the weight of water can deflect the roof and you will end up with a swimming pool which will want to leak in through the skylight.
Re: Ci Autohome New Roof!
Posted: 12 May 2017, 11:41
by TheDocmeister
This is the state of play after a couple of hours at it this morning. Just about ready for starting with the glassfibre...
I did have concerns about getting some sort of run off built into the roof. The plan is to support the foam down the middle from underneath on some 4x4 tyres as I apply the glassfibre. This should lift the edges clear of the ground. I think there's then still enough give in the boards to create a slight bulge towards the centre-line which can then be locked in by the GRP. Fingers crossed anyway!
Re: Ci Autohome New Roof!
Posted: 12 May 2017, 15:33
by TheDocmeister
Well,I managed to get some more done this afternoon...
GRP on the outside is go!!!

It's not perfect; some of the edges could have done with a bigger radius; not sure whether I have some trapped air or if the white surface of the boards is lifting here and there but apart from that I'm delighted with the results of my first effort at foam core GRP laminate. I'm going to let this cure now then trim the edges and flip it over to start on the inside. Happy days!
Re: Ci Autohome New Roof!
Posted: 19 May 2017, 20:38
by bluebus1987
Looks great! Does the foam board have a trade name? or is it some form of roofing product?
Re: Ci Autohome New Roof!
Posted: 19 May 2017, 23:59
by TheDocmeister
I'm not sure on the trade name, but I got it from these guys:
http://www.ccfltd.co.uk/
I was driving past one day, just popped in and explained what I was looking for and they came up with the product. I'm pretty sure it was some sort of flooring board. The GRP suppliers had suggested the tissue faced board but didn't have big enough sheets in stock. I reckoned on six of their panels to make up the roof top with subsequent potential for dodgy joins. At least this way there's only one join down the middle...
Re: Ci Autohome New Roof!
Posted: 20 May 2017, 07:15
by spherehopper
bluebus1987 wrote:Looks great! Does the foam board have a trade name? or is it some form of roofing product?
It's called insulation board and goes under trade names of Celotex, Kingspan, Ballytherm etc. It's very common in house construction. I'm just stripping my ceilings upstairs, removing plasterboard and installing this in between the rafters before plasterboarding again.
Local builders merchants or even Wickes stock it. About £35 a sheet (120cm by 240cm). Cut with normal jack saw.
http://www.wickes.co.uk/Products/Buildi ... /c/1000272" onclick="window.open(this.href);return false;
The other material to consider if you wanted a flexible/blanket material is TLX Gold.
https://youtu.be/yyy7x0GJ4Xg" onclick="window.open(this.href);return false;
Re: Ci Autohome New Roof!
Posted: 20 May 2017, 10:30
by bluebus1987
Yeah, I've got loads of celotex/kingspan. Its the tissue face that I've not come across, hence the question. You can if your carefull strip the foil off one surface of kingspan to allow the board to curve, which leaves the bare foam to bond to. Having a tissue scrim would be so much easier to get a good surface without building up too much.
I was wondering if it was an insulation product to go beneath fibreglass or poured rubber roofs. If it was it would probably be cheaper than from a GRP suppliers.
Re: Ci Autohome New Roof!
Posted: 22 May 2017, 18:31
by TheDocmeister
Have been too busy at work and home to get on much further with the roof, hopefully an update in the next few days...
However, I did dig out the receipt for the foam board. The sheets I got were 2400x1200x25 Kingspan Kooltherm K3 Floorboard Phenolic.
Re: Ci Autohome New Roof!
Posted: 25 May 2017, 23:05
by TheDocmeister
Photos tomorrow!

Tonight I got the lower edges of the roof trimmed and sanded straight, then glassed up the inside sections between the marine ply framing - followed by the bottom exposed foam edge of the side panels.
I also filled the gap formed inside by the sloping front face of the roof where it joins the main roof panel using the glass strand reinforced filler they sell as a hole fixer - Isopon P40 or whatever it's called. I wasn't sure there was enough room to spare to cut an angle on the roof panel to glue the front piece to, but this way also lets me round off that inside edge to make a smoother joint to roll the GRP over.
I bought another 5kg of resin today, 5kg of white 'top coat' - self levelling roll on gel coat and some more roller heads. £52.
Re: Ci Autohome New Roof!
Posted: 10 Jun 2017, 08:57
by martin83
I'm itching for an update? I'm watching with interest.
Re: Ci Autohome New Roof!
Posted: 10 Jun 2017, 13:58
by TheDocmeister
Trying to get back out to it this afternoon - weather permitting!
I've basically been trimming edges and filling voids within the lay-up. Wrapping the mat around the edges has left a few areas that needed attention even though I thought I'd rounded off the corners and joins enough to avoid this. Top, most of the inside and the edges all have at least one layer of mat and resin now and I'm heading towards the final woven layer on top and then gel coat.
Re: Ci Autohome New Roof!
Posted: 10 Jun 2017, 14:17
by martin83
Cheers doc can't wait to see how it looks with the gel coat on.
