I fully understand, and thank you for your valuable advice.
"36 staples"!! - ouch...
Yes I think I would have quickly reviewed my safety regime after an injury like that.
Is there not a Wiki on safety information like that?
It is common sense and probably natural for people who use cutting and grinding discs on a regular basis.
But there are a lot of "have a go heroes" that have the best of intentions, but barely enough knowledge.
I would like to think that I have enough "way with all", to be moderately safe. But it does not hurt to be reminded of even the most basic safety information.
Robsey's Rusty Wreck.
Moderators: User administrators, Moderators
-
Robsey

- Registered user
- Posts: 1169
- Joined: 19 May 2012, 20:45
- 80-90 Mem No: 11137
- Location: East Manchester
Re: Robsey's Rusty Wreck.
1983 Tin Top with a poorly DF and 4 speed DT box.
1987 Electrics and a DJ engine.
Maybe one day I might get it finished
1987 Electrics and a DJ engine.
Maybe one day I might get it finished
-
Dazco

- Registered user
- Posts: 2299
- Joined: 18 Dec 2011, 15:44
- 80-90 Mem No: 10544
- Location: Sheffield. 1984 autosleeper trooper. 1.9 petrol called Jambo
Re: Robsey's Rusty Wreck.
You're cracking on with it . Kind of looking forward to getting stuck into mine .
Auto sleeper fitted with EJ 20 subaru lump
-
Robsey
- Registered user
- Posts: 1169
- Joined: 19 May 2012, 20:45
- 80-90 Mem No: 11137
- Location: East Manchester
Re: Robsey's Rusty Wreck.
a bit more progress.
Troy (the owner of the unit where the van is stored) had already decreed that he wanted to spend tonight on the van, despite having his Nova, an MX5, an XR2 and a Capri yearning for his attention.
He was keen to put some metal on the van, rather than continuing to cut more metal off.
Using the right side for a pattern, the first job was to make up a diagonal outrigger lower panel for the left side.
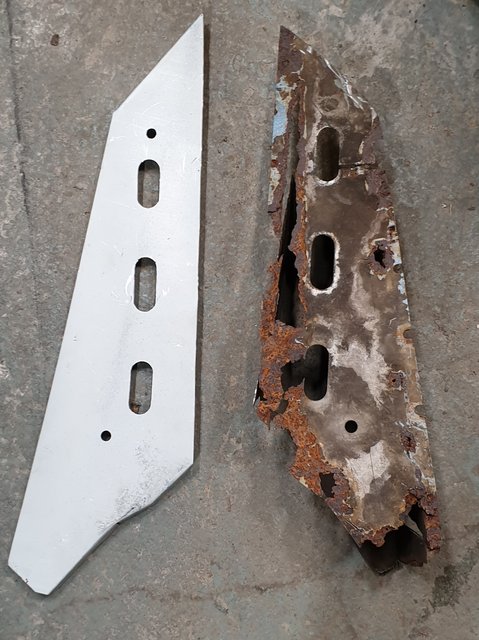
There is a big hole on the right side member, but I could not see this on the left.
It shows a big hole on both in Haynes.
Any idea if the big hole is needed, and if so, what it's function is?
Whilst he did this, my job was to cut out the rear of the arch, where it was very rusty.
Then I decided that I really wanted the remainder of the bottom wishbone off the van.

Strange how the biggest bolts still seem to be the easiest to undo.

Troy made a brew, so I set about removing the underseal from the underside of the inner arch.
(Sorry no pictures).
But he pointed out that heating the other side of the panel (very hot) caused the underseal to almost fall off, meaning that a scraper quickly removed any unwanted material. Heated too hot, and the underseal goes quite rubbery.
Final job was for him to make up and fit a new piece, for the rear of the arch.
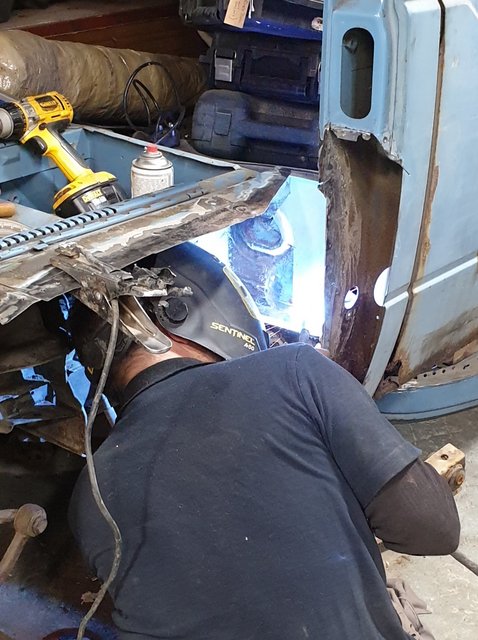
The man in action.
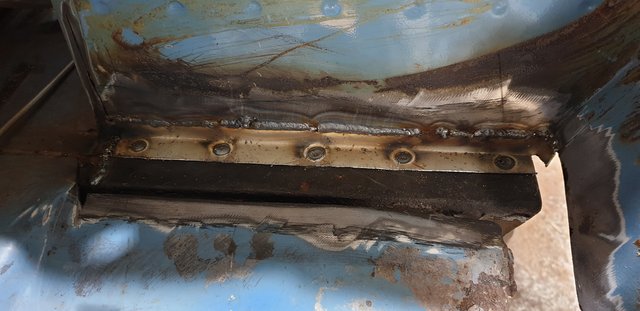
And the first panel welded in place.
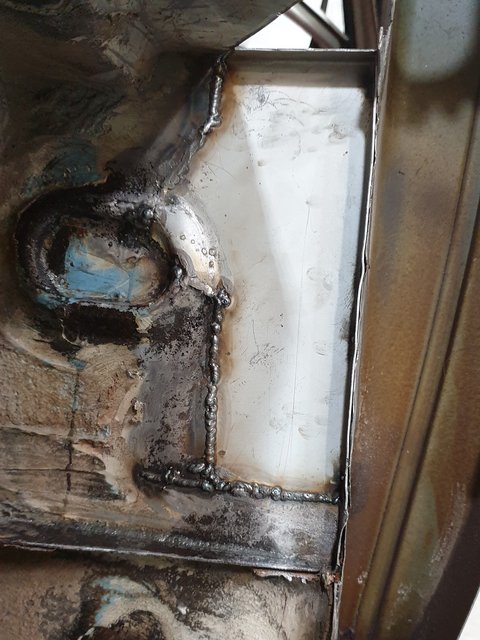
Check out the formed oval - it is used to locate the left fuel tank expansion bottle.
I felt a bit of a spare part at various stages of the evening.
Tricky trying to be useful, without getting in the way.
Troy (the owner of the unit where the van is stored) had already decreed that he wanted to spend tonight on the van, despite having his Nova, an MX5, an XR2 and a Capri yearning for his attention.
He was keen to put some metal on the van, rather than continuing to cut more metal off.
Using the right side for a pattern, the first job was to make up a diagonal outrigger lower panel for the left side.
There is a big hole on the right side member, but I could not see this on the left.
It shows a big hole on both in Haynes.
Any idea if the big hole is needed, and if so, what it's function is?
Whilst he did this, my job was to cut out the rear of the arch, where it was very rusty.
Then I decided that I really wanted the remainder of the bottom wishbone off the van.
Strange how the biggest bolts still seem to be the easiest to undo.
Troy made a brew, so I set about removing the underseal from the underside of the inner arch.
(Sorry no pictures).
But he pointed out that heating the other side of the panel (very hot) caused the underseal to almost fall off, meaning that a scraper quickly removed any unwanted material. Heated too hot, and the underseal goes quite rubbery.
Final job was for him to make up and fit a new piece, for the rear of the arch.
The man in action.
And the first panel welded in place.
Check out the formed oval - it is used to locate the left fuel tank expansion bottle.
I felt a bit of a spare part at various stages of the evening.
Tricky trying to be useful, without getting in the way.
Last edited by Robsey on 26 Aug 2020, 22:33, edited 1 time in total.
1983 Tin Top with a poorly DF and 4 speed DT box.
1987 Electrics and a DJ engine.
Maybe one day I might get it finished
1987 Electrics and a DJ engine.
Maybe one day I might get it finished
-
Dazco
- Registered user
- Posts: 2299
- Joined: 18 Dec 2011, 15:44
- 80-90 Mem No: 10544
- Location: Sheffield. 1984 autosleeper trooper. 1.9 petrol called Jambo
Re: Robsey's Rusty Wreck.
Fantastic work , itll be back on the road for the weekend 
Auto sleeper fitted with EJ 20 subaru lump
-
Robsey
- Registered user
- Posts: 1169
- Joined: 19 May 2012, 20:45
- 80-90 Mem No: 11137
- Location: East Manchester
Re: Robsey's Rusty Wreck.
at about 4 hours per week,
I think you are being a tad optomistic - ha ha.
I totally expect that there is a couple of years of work to do at that work rate.
(Based on my skill level, and the ongoing costs of parts, materials, labour, storage etc...)
Thanks, but I have to give Troy the lion's share of the recognition for any progress made.
Cutting metal off and cleaning up edges in preparation is very easy to do. The clever bit is putting it all back together again.
1983 Tin Top with a poorly DF and 4 speed DT box.
1987 Electrics and a DJ engine.
Maybe one day I might get it finished
1987 Electrics and a DJ engine.
Maybe one day I might get it finished
-
Robsey
- Registered user
- Posts: 1169
- Joined: 19 May 2012, 20:45
- 80-90 Mem No: 11137
- Location: East Manchester
Re: Robsey's Rusty Wreck.
A bit later than hoped, but here is this Mondays small bit of progress.
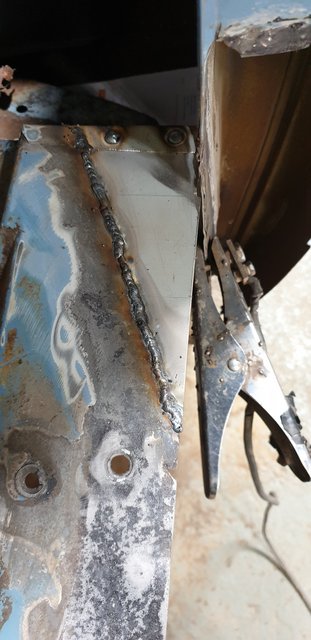
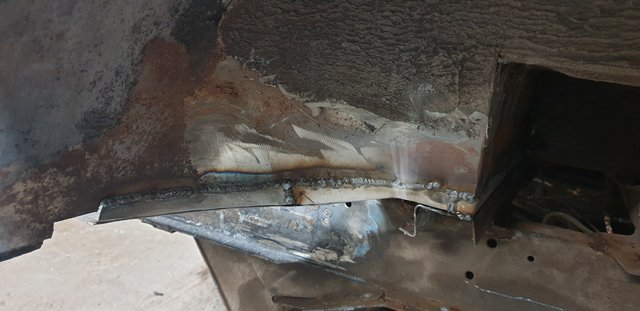
Three strips of rot cut out, and two small pieces welded in.
A nice mix of puddle-welds and seam welds.
I made the triangular bit at the back of the inner arch.
As usual Troy welded it in.
From this...
To this...
The strips that were cut off, were the base of the wheel arch 'tub' and the passenger footwell where it meets the base of the passenger seat / back-up battery box.
Metal cut out.

And fresh metal welded in.
Still plenty of tidying up of the welds to do, but they are nice and solid.
Amazing how much quicker Troy is at making up a piece of metal, virtually by eye, free hand.
Whereas I was doing a more old-fashioned cardboard template approach.
Three strips of rot cut out, and two small pieces welded in.
A nice mix of puddle-welds and seam welds.
I made the triangular bit at the back of the inner arch.
As usual Troy welded it in.
From this...
To this...
The strips that were cut off, were the base of the wheel arch 'tub' and the passenger footwell where it meets the base of the passenger seat / back-up battery box.
Metal cut out.
And fresh metal welded in.
Still plenty of tidying up of the welds to do, but they are nice and solid.
Amazing how much quicker Troy is at making up a piece of metal, virtually by eye, free hand.
Whereas I was doing a more old-fashioned cardboard template approach.
1983 Tin Top with a poorly DF and 4 speed DT box.
1987 Electrics and a DJ engine.
Maybe one day I might get it finished
1987 Electrics and a DJ engine.
Maybe one day I might get it finished
-
Robsey
- Registered user
- Posts: 1169
- Joined: 19 May 2012, 20:45
- 80-90 Mem No: 11137
- Location: East Manchester
Re: Robsey's Rusty Wreck.
Aaaand Week ten of the rebuild.
I didn't think that I achieved much this week.
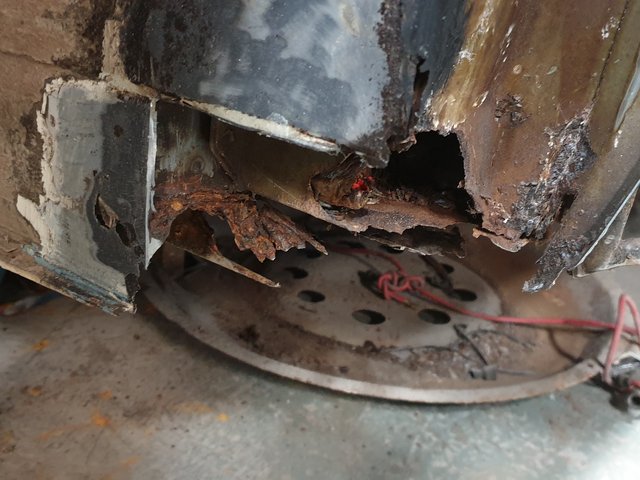
In reality, I cut away the spare wheel carrier from under the front of the van. Everything was rusted solid and the carrier disc itself was toast.
Cutting disc to the rescue.
And I made a couple of tiddley patches for the cab floor.
I spent ages doing what should be a quick and simple job.
As usual, Troy welded them in.

He is very specific, so ensured that the same 'gap' remained between the plates.
A light dressing off for now to remove the excess weld.
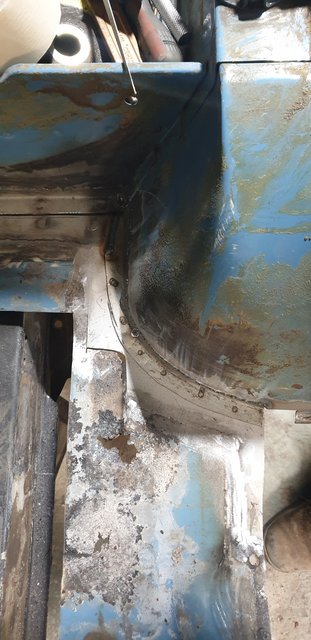
Unfortunately, this week was hindered by the arrival of a Harrison lathe, which brought memories flooding back of my early machine-shop days.
Even the smell of the gearbox grease took me back 30 years.
So we spent a good hour or so with me giving him a lesson of operating a lathe, including screw cutting, setting spindle and travel speeds, and of course general safety. - "take that chuck key out of the chuck!!" - yikes!!
I didn't think that I achieved much this week.
In reality, I cut away the spare wheel carrier from under the front of the van. Everything was rusted solid and the carrier disc itself was toast.
Cutting disc to the rescue.
And I made a couple of tiddley patches for the cab floor.
I spent ages doing what should be a quick and simple job.
As usual, Troy welded them in.
He is very specific, so ensured that the same 'gap' remained between the plates.
A light dressing off for now to remove the excess weld.
Unfortunately, this week was hindered by the arrival of a Harrison lathe, which brought memories flooding back of my early machine-shop days.
Even the smell of the gearbox grease took me back 30 years.
So we spent a good hour or so with me giving him a lesson of operating a lathe, including screw cutting, setting spindle and travel speeds, and of course general safety. - "take that chuck key out of the chuck!!" - yikes!!
1983 Tin Top with a poorly DF and 4 speed DT box.
1987 Electrics and a DJ engine.
Maybe one day I might get it finished
1987 Electrics and a DJ engine.
Maybe one day I might get it finished
-
Robsey
- Registered user
- Posts: 1169
- Joined: 19 May 2012, 20:45
- 80-90 Mem No: 11137
- Location: East Manchester
Re: Robsey's Rusty Wreck.
New parts Klaxon!!
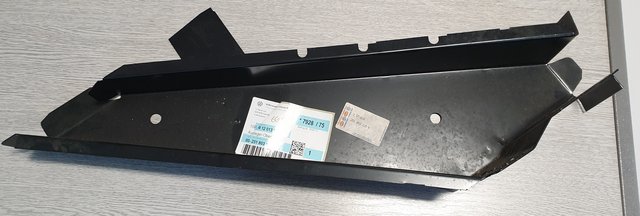
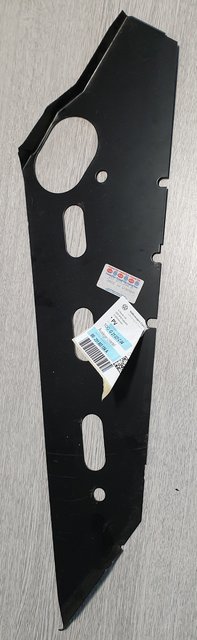
Original VW parts - the upper box section is no longer available.
Making their way onto my van this autumn.
I will be cleaning any remnants of the old left outrigger from the van next week.
Original VW parts - the upper box section is no longer available.
Making their way onto my van this autumn.
I will be cleaning any remnants of the old left outrigger from the van next week.
1983 Tin Top with a poorly DF and 4 speed DT box.
1987 Electrics and a DJ engine.
Maybe one day I might get it finished
1987 Electrics and a DJ engine.
Maybe one day I might get it finished
-
Robsey
- Registered user
- Posts: 1169
- Joined: 19 May 2012, 20:45
- 80-90 Mem No: 11137
- Location: East Manchester
Re: Robsey's Rusty Wreck.
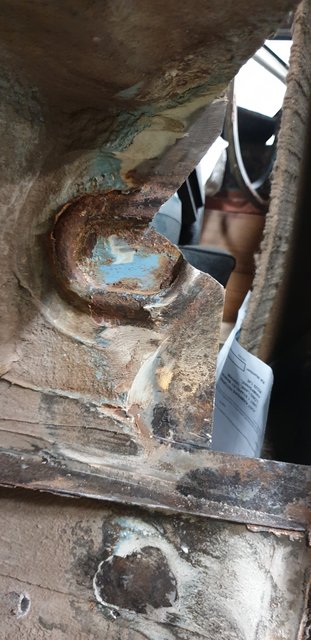
Hmm - a quick question for Mick. (Plasticman).
Can I box off the front of the B post and wheel arch before looking at the sills and jacking point?
Or do I need to sort the inner sill and jacking point before repairing the front and bottom of the B post.
It is pretty much toast underneath the B post and around the jacking point.
Can I box off the front of the B post and wheel arch before looking at the sills and jacking point?
Or do I need to sort the inner sill and jacking point before repairing the front and bottom of the B post.
It is pretty much toast underneath the B post and around the jacking point.
1983 Tin Top with a poorly DF and 4 speed DT box.
1987 Electrics and a DJ engine.
Maybe one day I might get it finished
1987 Electrics and a DJ engine.
Maybe one day I might get it finished
-
Robsey
- Registered user
- Posts: 1169
- Joined: 19 May 2012, 20:45
- 80-90 Mem No: 11137
- Location: East Manchester
Re: Robsey's Rusty Wreck.
Week eleven was quite a random affair.
First thing was to compare Troys left lower outrigger panel to a VW original right lower outrigger panel.
He was very pleased with his masking-tape pattern panel.

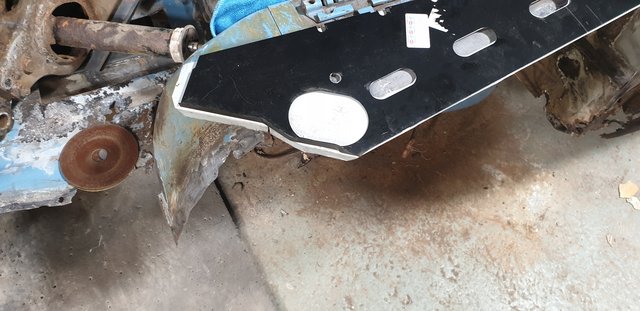
Very close indeed. We still never sussed out the reason for the huge hole on the wide end.
There is a big square nut in there, but it is captive, so spanner access is not required.
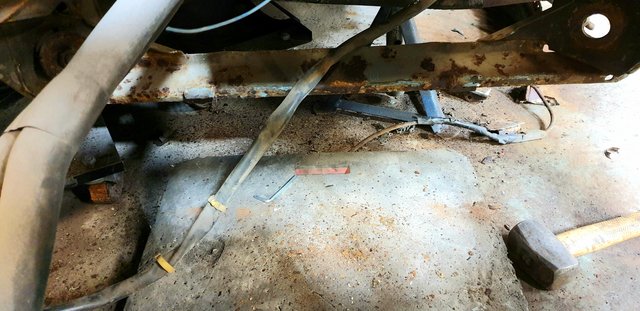
As per my proposal last week, I cleaned the remnants of the old outrigger away.
It took a long time because of limited access preventing the use of the spot drill.
And a hidden bolt (15 hex head bolt) in the A pillar holding the box section in place, via the captive nut mentioned above.
I also had to cut another section of floor out to remove an old support strip.

So lots of grinding and chiselling ensued.
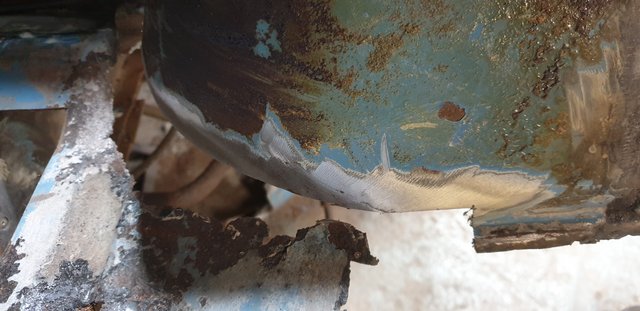
Until I was able to offer up the first big panel - the new upper outrigger panel.
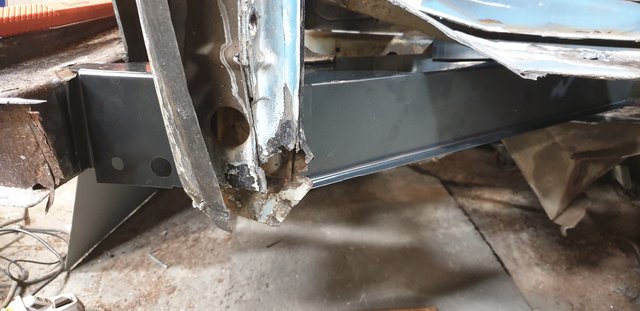
The bolt holes did not quite line up, but a little fettling should get a good fit.
More next week.
First thing was to compare Troys left lower outrigger panel to a VW original right lower outrigger panel.
He was very pleased with his masking-tape pattern panel.
Very close indeed. We still never sussed out the reason for the huge hole on the wide end.
There is a big square nut in there, but it is captive, so spanner access is not required.
As per my proposal last week, I cleaned the remnants of the old outrigger away.
It took a long time because of limited access preventing the use of the spot drill.
And a hidden bolt (15 hex head bolt) in the A pillar holding the box section in place, via the captive nut mentioned above.
I also had to cut another section of floor out to remove an old support strip.
So lots of grinding and chiselling ensued.
Until I was able to offer up the first big panel - the new upper outrigger panel.
The bolt holes did not quite line up, but a little fettling should get a good fit.
More next week.
1983 Tin Top with a poorly DF and 4 speed DT box.
1987 Electrics and a DJ engine.
Maybe one day I might get it finished
1987 Electrics and a DJ engine.
Maybe one day I might get it finished
-
Robsey
- Registered user
- Posts: 1169
- Joined: 19 May 2012, 20:45
- 80-90 Mem No: 11137
- Location: East Manchester
Re: Robsey's Rusty Wreck.
Week twelve saw the repair to the wheel tub / arch / footwell intersection.
I had made up a few small repair parts,
but then it was decided to change the plan.
instead, these parts were made and welded in.
Whilst I was in the unit, I thought that I would take out the heater box.
Despite having no radiator fitted for 10 years, some coolant still poured out of the matrix.
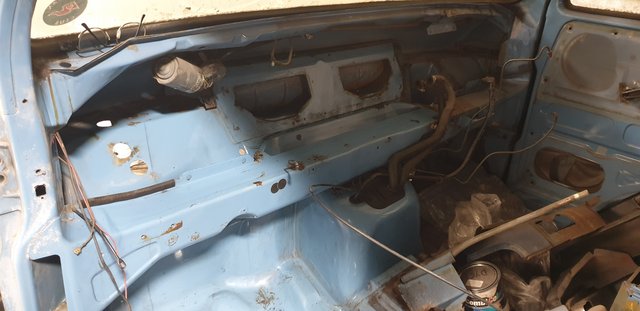
And the verdict was.
Blower motor - seized solid.
Resistor pack - crumbly green outer shell and terminals very rusty.
Amazingly the matrix looked to be in near perfect condition...
And the foam on all the flaps was very powdery, and rubbed off under the lightest touch of the finger tips.
So new fan motor and heater box foam kit are on order.
Only the wiper motor and linkage to remove.
But I will need to take the screen out first.
(Two rusted bolt heads).
I had made up a few small repair parts,
but then it was decided to change the plan.
instead, these parts were made and welded in.
Whilst I was in the unit, I thought that I would take out the heater box.
Despite having no radiator fitted for 10 years, some coolant still poured out of the matrix.
And the verdict was.
Blower motor - seized solid.
Resistor pack - crumbly green outer shell and terminals very rusty.
Amazingly the matrix looked to be in near perfect condition...
And the foam on all the flaps was very powdery, and rubbed off under the lightest touch of the finger tips.
So new fan motor and heater box foam kit are on order.
Only the wiper motor and linkage to remove.
But I will need to take the screen out first.
(Two rusted bolt heads).
1983 Tin Top with a poorly DF and 4 speed DT box.
1987 Electrics and a DJ engine.
Maybe one day I might get it finished
1987 Electrics and a DJ engine.
Maybe one day I might get it finished
Re: Robsey's Rusty Wreck.
Great work - keep the posts coming 
88 Autosleeper Trident 1.9
Hythe, Kent.
Hythe, Kent.
-
Robsey
- Registered user
- Posts: 1169
- Joined: 19 May 2012, 20:45
- 80-90 Mem No: 11137
- Location: East Manchester
Re: Robsey's Rusty Wreck.
Week thirteen.
I brought the heater unit home for stripping.
The new motor and flap seals are on their way.
The resistor pack is currently out of stock.
So Monday seemed to be an odd night.
I repaired the four mounting holes for the heater box. (Drilled out the old snapped studs and re-tapped the threaded holes).
I then cleaned, rubbed down and rust treated the main interior crashbar and the whole area that is normally hidden by the heater unit.
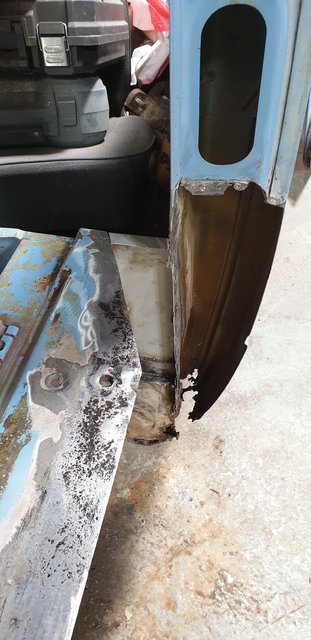
As per my previous suggestions, it was necessary to make up a front facet for the B post, so that the arch can then be fitted.
As usual this meant more cutting out.
This time the front of the sills where the jacking point is located.
Troy then made up and trial fitted the B post panel. (Using self drilling / tapping panel screws.)

And then for "pooh" n giggles, we trial fitted the front arch.

It would appear that things are indeed moving forward.
Just waiting for the bulk order of TechniQ Etch Primer to arrive.
Then we can look at spot welding the panels in place.
About 5 panels to my reckoning.
The question of removing the screen was discussed...
Maybe next week to access the wiper motor mounts and the rusty screen frame in the bottom left corner.
I brought the heater unit home for stripping.
The new motor and flap seals are on their way.
The resistor pack is currently out of stock.
So Monday seemed to be an odd night.
I repaired the four mounting holes for the heater box. (Drilled out the old snapped studs and re-tapped the threaded holes).
I then cleaned, rubbed down and rust treated the main interior crashbar and the whole area that is normally hidden by the heater unit.
As per my previous suggestions, it was necessary to make up a front facet for the B post, so that the arch can then be fitted.
As usual this meant more cutting out.
This time the front of the sills where the jacking point is located.
Troy then made up and trial fitted the B post panel. (Using self drilling / tapping panel screws.)
And then for "pooh" n giggles, we trial fitted the front arch.
It would appear that things are indeed moving forward.
Just waiting for the bulk order of TechniQ Etch Primer to arrive.
Then we can look at spot welding the panels in place.
About 5 panels to my reckoning.
The question of removing the screen was discussed...
Maybe next week to access the wiper motor mounts and the rusty screen frame in the bottom left corner.
1983 Tin Top with a poorly DF and 4 speed DT box.
1987 Electrics and a DJ engine.
Maybe one day I might get it finished
1987 Electrics and a DJ engine.
Maybe one day I might get it finished
-
Plasticman
- Trader
- Posts: 8047
- Joined: 12 Oct 2005, 20:55
- 80-90 Mem No: 1948
- Location: lincolnshire
Re: Robsey's Rusty Wreck.
good work,
will pm you,
dont forget to hang the door prior to welding up
mm
will pm you,
dont forget to hang the door prior to welding up
mm
-
Robsey
- Registered user
- Posts: 1169
- Joined: 19 May 2012, 20:45
- 80-90 Mem No: 11137
- Location: East Manchester
Re: Robsey's Rusty Wreck.
Thanks Mike,
Reply to pm sent. (Apologies, it is a long reply).
Your comment echoes our thoughts about hanging the cab door first, before welding everything in to place.
The lad doing the welding in is a bit of a perfectionist ( it could be a touch of O.C.D.), and so I know that he will get the best compromise of panel gaps and overall fit.
In the mean-time, the etch primer, blower motor and heater box foam kit have all arrived,
so this coming Sunday will be when I refurbish the heater box assembly. (See the next post).
Thinking ahead, I suspect that I should weld up the door-step rubber location holes.
That would reduce the potential for water to get in and rust the step out again.
I would rather ‘Evo-Stik’ some rubber pieces in place.
Perhaps use some nice simple ribbed rubber matting.
Last edited by Robsey on 01 Oct 2020, 23:17, edited 1 time in total.
1983 Tin Top with a poorly DF and 4 speed DT box.
1987 Electrics and a DJ engine.
Maybe one day I might get it finished
1987 Electrics and a DJ engine.
Maybe one day I might get it finished